The biggest advantage of IP based Wireless Sensor Networks is their ability to be seamlessly connected to the Internet. A device which passes data from the lowpan to ordinary network is called a “border router”. Such a device must support at least two network interfaces: 802.15.4 for the lowpan, and 802.3 or 802.11 for the uplink.
Contiki OS does not currently support multiple interfaces, but it is possible to deploy a border router on Contiki with serial interface for uplink. Depending on the hardware platform it can be done in two ways: either with special software called tunslip6, or with RNDIS device driver. Both solutions need a running PC with Linux or Windows, which makes them inconvenient for simple home automation solutions.
Because of that I decided to develop a simple border router with Ethernet interface. After asking on Contiki mailing list I discovered that nobody is actively working on a multiple interfaces support, so I decided to add it myself. First results of ping tests are presented below - I wrote a simple tutorial in a spirit of Contiki Atmel Raven Tutorial.
Hardware
I assembled a quick prototype board with 15.4 and Ethernet interfaces. I called it “Grinch” (I did most of the soldering during last Christmas). The board is based on the Zigbit module. Zigbits contain Atmega 1281 microcontroller and AT86RF230 radio transceiver that communicate over SPI. For Ethernet I chose Microchip ENC28J60, very simple Ethernet controller with SPI interface.
Last year I designed and ordered some breakout boards for the Zigbits with goldpin connectors, and ENC28J60 is sold in DIP packages, so I chose not to use any SMD components in my project. I used simple prototype board with greenwire connections. I soldered the components ad-hoc without a schematic, but later I made some simple drawing in Eagle to document the project (link). Below is the photo of the board.
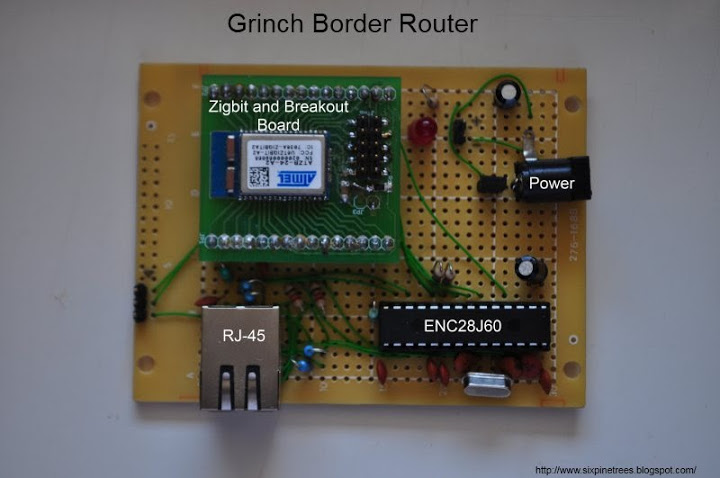
Zigbit has a serious drawback - it has only 8kb of RAM, and it limits the number of neighbors and routes that can be maintained. Also it leaves very little room for the webserver (which is very useful for debugging). Also 6lowpan fragmentation is not possible - there is no space for buffers. For any future border router projects I strongly recommend Redwire MC13224 or Dresden Elektronik Atmega128RFA1 modules.
Working Grinch Border Router is shown on a picture below:
After assembling the board it is good to test it using some simple IPv4 AVR software unrelated to Contiki. Tuxgraphics is a very good page with test examples.
Software
The mod contains the following additions to the github contiki-mirror repo:
-
ENC28J60 driver for AVR microcontrollers
-
Multiple interfaces support
ENC28J60 driver is based on driver by Guido Socher and wrapped with a modified template from Contiki Docs - example-packet-drv.c . The only significant change from Guido’s code is that first 14 bytes of every received frame are copied into the different buffer than the rest. This way no intermediate processing is necessary before submitting a packet to uip stack. ENC28J60 driver switches the interrupts off for the duration of the read - otherwise if RF230 interrupts launch during ENC read, it can crash the system for good. Contiki is a non-preemptive system, so ENC28J60 and RF230 drivers can peacefully coexist and share SPI interface - as long as interrupts are taken care of and both drivers properly set the Chip Select (CS) pin after using the interface. ENC28J60 driver works fairly well, and was tested with IPv4 and IPv6 Contiki - it can be used in projects totally unrelated to Wireless Sensor Networks. Multiple interfaces support is implemented in a very straightforward way - all interface-describing structures defined in /core/net/uip-ds6.h are changed into arrays of structures instead. All functions are modified to get along with this change. The modification is not very complicated, but code needs to be fixed in numerous places. Most code changes are located in the /core/net directory. The more serious code changes are:
-
Initialization - contiki-conf has to be changed to support two interfaces
-
Link-layer Address Option construction - Ethernet and 802.15.4 link-layer addresses have different length
-
Periodic processing - to keep the code simple single timer is used for all interfaces
For proper functioning of uIP stack, every function needs to operate on correct interface. This is done by a combination of these two methods:
-
Common functions operate on the interface, which id is saved in a
uip_last_active_interfacevariable (current name is not very good). The value of this variable is changed whenever a packet is received or meant to be sent. For example ping reply is always sent to the interface where the request came from. -
Interface specific functions operate on hardcoded interface identifiers - for example RPL packets are always sent to
IF_RADIOinterface, and ENC28J60 driver operates only onIF_FALLBACKinterface.
This part of mod has to be considered experimental - there is no guarantee that any Contiki tools or apps will run with it (for example Cooja). Git repository with the mod is accessible at Github:
git@github.com:mwasilak/contiki-mirror.git branch: multiple-netif
Test overview
This demo is based entirely on pings - with no application data transfer. I tried a simple test with HTTP, but it failed completely - the reason for that is probably the limited capability of Zigbit to fragment IPv6 HTTP communications (they are normally too big). I plan to use CoAP later but I have no working code for Raven yet. However the ping test can verify most of the properties of the new multiple interfaces capability.
Compiling the code
Binaries can be compiled using the following commands:
cd c:/contiki-mirror/examples/webserver-ipv6-raven
make
cd c:/contiki-mirror/platform/avr-ravenlcd
make
cd c:/contiki-mirror/examples/ipv6/rpl-border-router-eth
make
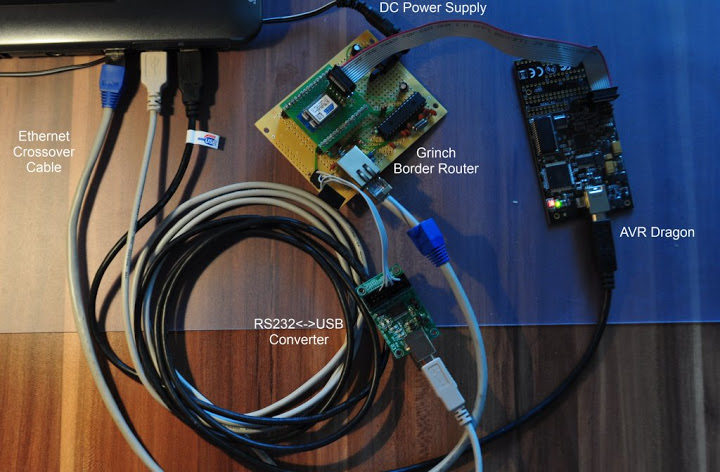
All examples have proper Makefile.target files - there is no need to specify target from command line. Note that AVR Raven is also compiled with multiple interfaces support, but number of interfaces is set to 1. Installing the software on Raven is shown in the Contiki Atmel Raven Tutorial. Installing the software on Grinch is similar - but it is dependent on the physical layout of the board.
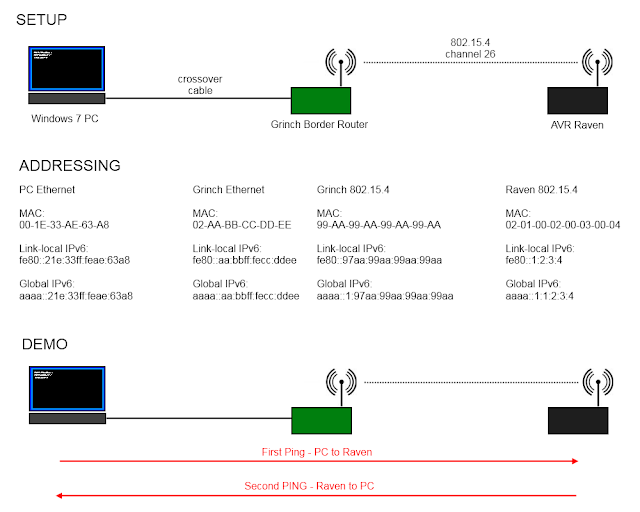
Addressing and Windows setup
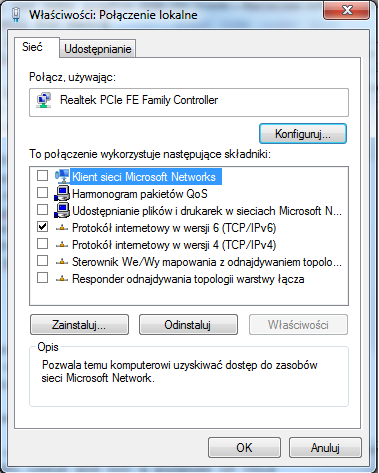
The example uses RPL routing on the 802.15.4 side and static routes on the Ethernet side. Ethernet IPv6 prefix and RPL prefix are both hard-coded inside rpl-border-router-eth.c file. Handling of these two prefixes is different - IPv6 prefix makes the node assume, that all addresses with the same prefix are on link. Because of that, this type of prefix doesn’t work well for radio links, where some nodes with a matching address can be out of range. Inside rpl-border-router-eth.c file there is a quick hack which adds the IPv6 prefix only for IF_FALLBACK interface. To run the test it’s necessary to add a Global IPv6 Address for the PC Ethernet interface (otherwise pings from Raven to PC won’t work), and to add a static route to Raven. Here are the necessary commands for Windows 7: First you have to find the name of the Ethernet interface on a PC. It can be checked under Network->Properties->Network connections:
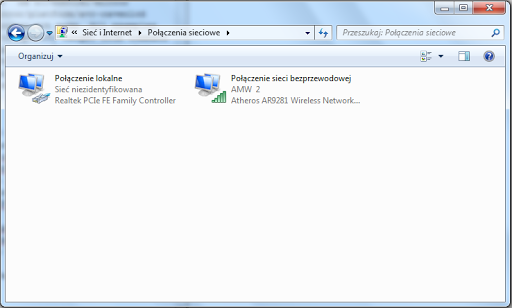
As you can see on my PC there are two network interfaces - one of them is WiFi and the other one is Ethernet. The name of Ethernet interface is “Połączenie lokalne” (I have a Polish version of Windows 7 - don’t worry your name will be normal :) ). Now it’s good to right-click the Ethernet connection and uncheck all fields except IPv6:
Next you can close Network Properties and open Command Line as an administrator. Type:
ipconfig
Windows displays the information about interfaces. The result below:
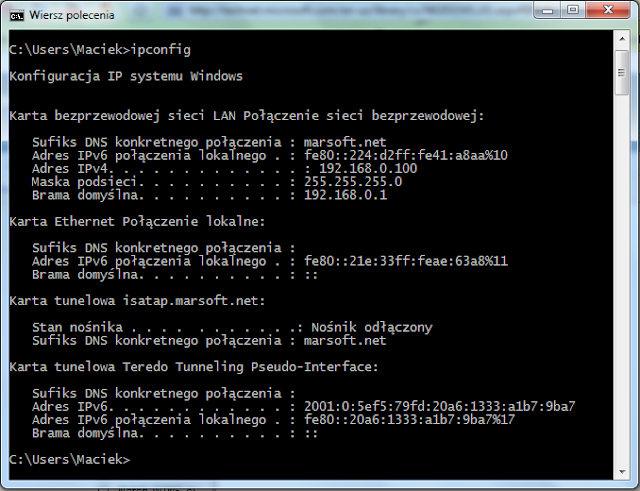
As you can see, “Połączenie lokalne” has no IPv4 addresses and one IPv6 address fe80::21e:33ff:feae:63a8%11. This is a link-local address, and it’s not enough for the test. We have to add a Global IPv6 Address. We will use a prefix aaaa::/64 and host address the same like the link local interface. You can use a different address but you will have to set it in: c:/contiki-mirror/platform/avr-raven/apps/raven-lcd-interface/raven-lcd.c in a next line after #elif MULTIPLE_INTERFACES_TEST_PING_PC (otherwise you won’t be able to ping PC from Raven). To add an address we will issue a command:
netsh interface ipv6 add address interface="Połączenie lokalne" aaaa::21e:33ff:feae:63a8
After address is added we can use ipconfig once again to verify the address. Next we have to add a route - otherwise the PC won’t know that it can reach Raven through border router. We will use a following command:
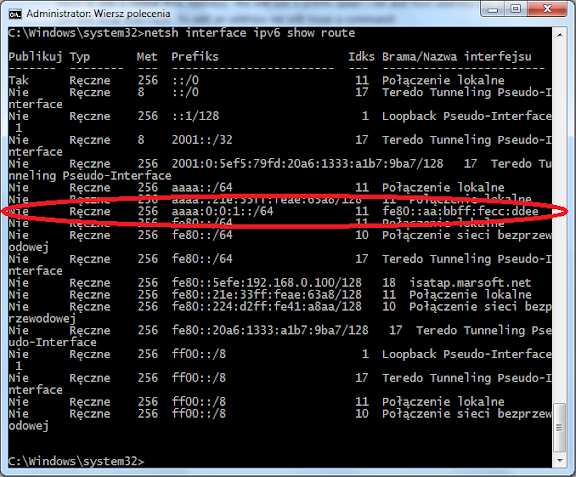
netsh interface ipv6 add route interface="Połączenie lokalne" aaaa:0:0:1::/64 fe80::aa:bbff:fecc:ddee
By using this command we inform our PC that to send packets to all addresses with aaaa:0:0:1::/64 prefix, it needs to send packets to a MAC address which matches the link-local address fe80::aa:bbff:fecc:ddee (it is a link-local address of the Grinch). To resolve the MAC address, PC automatically sends Neighbor Solicitation packet (it’s part of IPv6 stack). The outcome of the add operation can be verified with the command:
netsh interface ipv6 show route
Output below:
Running the test
CMD Files
Windows command line throughly sucks. It doesn’t remember previous commands like in Linux, and it’s tedious to enter all the commands from keyboard each time. To speed up the testing I suggest saving individual commands in text files with .cmd extension (for example pngr.cmd), inside your user directory. This way after your command line starts up, you are in your user directory, and you just have to type the name of the file, not the full command.
Pinging the Grinch from PC
You can ping both global and link-local address of the Grinch - it should reply in both cases. Plug in the power and Ethernet cable and type:
ping -6 fe80::aa:bbff:fecc:ddee
ping -6 aaaa::aa:bbff:fecc:ddee
My typical response time is 4ms. First ping almost always hits timeout - during this time PC performs address resolution.
Pinging the Raven from the PC
After powering the Raven up it will play some tune - funny, but not when you’re coding at 2AM :) . To succesfully ping the Raven we need to know, that Grinch has an RPL route to it. The route should be established in 15-20 seconds after starting the Raven. We can check it using webserver on Grinch. Open your web browser and type in address of the Grinch, like on the picture below.
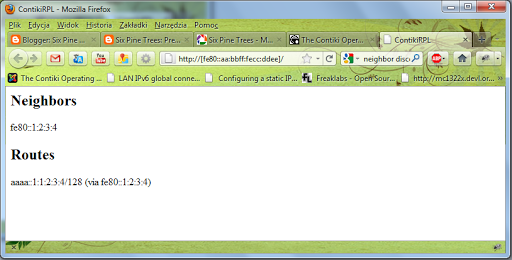
If the route exists it will be displayed on the webpage. After that you can issue a ping command:
ping -6 aaaa::1:1:2:3:4
The Raven will cheerfully beep after receiving ping, so you will immediately know if you’re successful. My typical response time is 17ms.
Pinging PC from the Raven
To ping the PC from the Raven we also need an RPL route to Grinch. Ping is initialized from Raven LCD menu - basically you have to click the little joystick switch twice to the right. Successful pings will also be confirmed with a beep.
Known Bugs
-
DAD packets for Ethernet interface are not really sent, because Ethernet link needs a second to initialize, therefore uIP always considers DAD as successful. I don’t have a good idea yet how to fix this bug, but it’s almost harmless. DAD for 802.15.4 are sent properly
-
Some comments don’t include interface ID - it’s not really a bug, just an inconvenience when using RS232 debug.
-
When Grinch Border Router is turned off and turned on again, it doesn’t register a route to Raven - it is some RPL issue and not a purpose of this tutorial. Remember to power up both Grinch and Raven simultanously before running the test.